Before delving into the information that we want to share with you on outdoor spigots, we want to outline the fact that many people use the terms “spigot” and “faucet” interchangeably. For clarification purposes, a “spigot” is an outdoor fitting that dispenses water. A “faucet” is an indoor water dispenser that releases water inside the home. They are found in the kitchen, bathroom, and laundry room. There are distinct differences between the spigot and the faucet. In this guide, we will be covering outdoor spigots.
What is a Spigot?
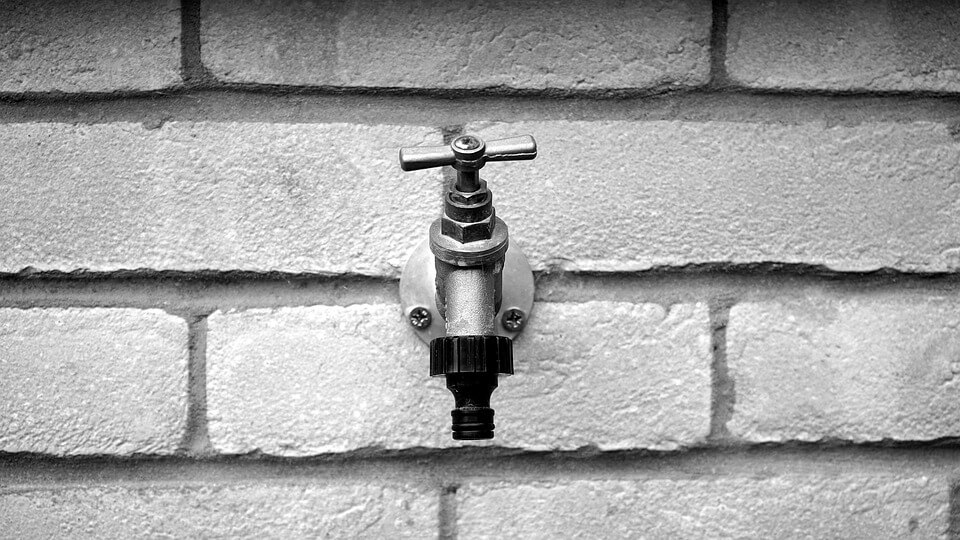
While we have briefly touched on this, we feel it is important to go into more detail in this section of this guide. A spigot is a type of fitting that extends outside of the home. It is exposed to all outdoor environmental conditions. As a result, the spigot is composed of different materials than indoor faucets. The materials must be highly durable and capable of withstanding outdoor conditions.
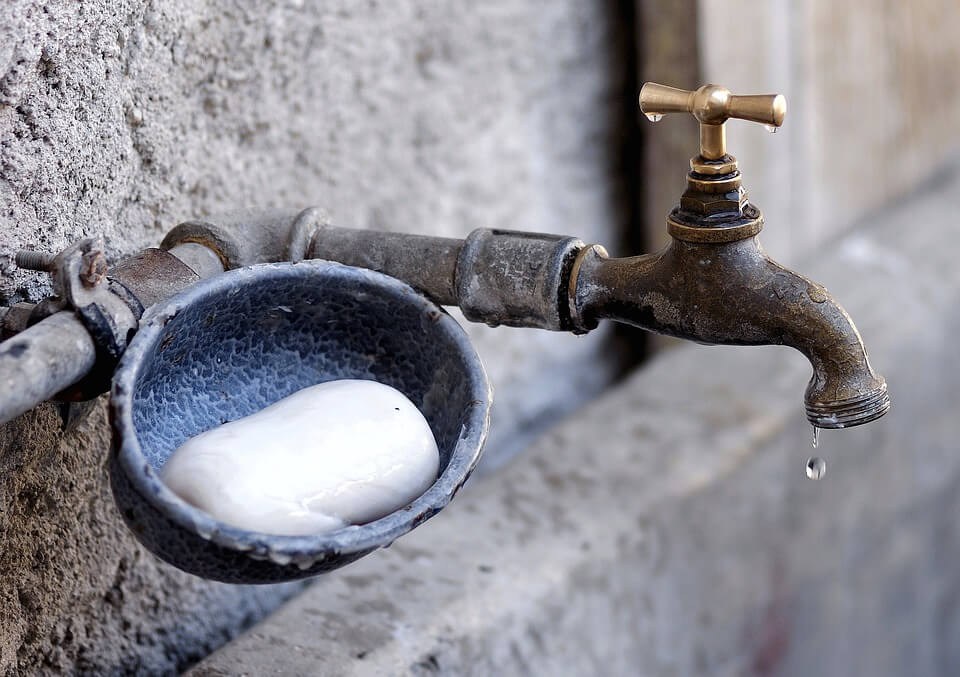
Spigots may also be referred to as a “silcock” or as a “hose bib”. The assembly inside of the outdoor spigot is called a “gate valve”. This allows you to gain access to water by turning clockwise and turning off the water by turning counter-clockwise.
This assembly is typically a type of metal and may even be brass. A spigot only has one handle. This is because it only allows access to cold water. It is possible to install spigots that distribute hot water, but not necessary for outdoor usage.
What Causes an Outdoor Spigot to Leak?
There are several potential reasons why an outdoor spigot may start to leak. In order to properly repair it, you must identify the problem. If the water is turned completely off and there is leakage at the spout, it is likely that the washer on the spigot either needs to be tightened a little.
In some instances, it may need to be completely replaced. If the spigot leaks around the handle when it is turned on, it is likely that the stem packing of the unit is experiencing issues.
Most leaks on outdoor spigots stem from worn-out washers, clogged pipes, mineral accumulation, and damaged pipes.
How Do I Stop an Outdoor Spigot from Leaking?
A leaking outdoor spigot may seem like a minor annoyance; however, if it is not fixed quickly, it could result in major problems.
Examples include increasing your utility expenses and creating damp areas around the base of the home that could negatively impact the foundation. The following outlines a few steps that may be taken to stop the leak – once and for all:
Tightening
In most instances, the spigot may just need to be tightened so that water is unable to get through. Simply tighten the packing nut immediately behind the handle.
This may be done by turning slightly. If this does not seem to do the trick, it may be time to replace the washer on the valve stem.
Replace the Washer
Turn the water to the spigot off at the meter or the breaker. Open the spigot by turning counter-clockwise. This will release air and water.
Unscrew the packing nut underneath the handle. With a pair of channel locks, it is possible to hold the body while using a wrench to loosen it.
Once successfully, hold the faucet and pull out the valve stem. Remove the screen that holds the washer. Put the new washer on and make sure the screen is in place. Push the valve stem back on and tighten the packing nut. Turn clockwise to ensure it is closed.
You may then turn the water back on to confirm the leak is gone.
Call a Plumber
If you lack the tools, knowledge, or comfort to perform these tasks, you should contact a plumber. This is an easy job that can be performed quickly.
It is oftentimes better to allow a professional to do the work so that you do not end up with a bigger problem than what you started with in the first place.
Why Does it Leak Only When I Turn It On?
If you find that the outdoor spigot leaks only when you have it turned on, it could just be an issue with the stem packing.
This is usually an easy fix that only requires you to tighten the nut used for retaining that is situated underneath the handle.
Just remove the screw that is positioned in the middle of the handle and pull off the handle to tighten the little nut inside just a little.
If this fails to fix the problem, you should remove the stem and completely replace the gasket.
How to Fix or Replace an Outdoor Spigot
Refer to the steps previously outlined for fixing an outdoor spigot. If you find that those steps do not resolve the problem, it may be time to completely replace the fixture. First, gather the tools that will be needed. These include the replacement spigot, pipe wrenches, lubrication spray for loosening the threads, stiff brush, clothes, and plumber’s tape. Once you have everything that is required, follow the steps outlined below:
- First, locate the shut-off valve for the water to your home. Typically, you will turn clockwise in order to completely shut off the water.
- Next, turn on the spigot. This will allow all residual water and air to completely escape.
- Now, you are ready to remove the spigot. Be firm, but careful as you do not want to damage any piping to your home. You will firmly old the pipe and the spigot and then twist the spigot only in a counter-clockwise motion.
- Now, take the stiff brush and completely clean the threads. All of the corrosion should be completely removed.
- Once the thread area is completely cleaned, you may take the plumber’s tape and seal the threads completely. Be careful in doing this. It needs to be done as close to perfectly as possible.
- Next, place the new spigot on the fixture. Once it is on firmly by tightening with your hand, go the extra step and tighten it with a wrench. It needs to be as secure as possible, without damaging the pipe that will supply the water to it.
- Turn on your water supply.
- Test the new spigot to ensure that there are no leaks. Look at the joint area, the stem, and the spout.
How the Spigot Works
Water is directly controlled by a valve. It may be a ball valve, a globe valve, or a gate valve. These are typically opened or even closed by a mechanism that is screwed down.
As you turn the spigot handle, the mechanism will either open or close the valve that is in place. If leaks occur, it is typically caused by wear and tear that is occurring within the area of this mechanism.
It is possible to replace components on an individual basis; however, it is typically cheaper and much easier to simply replace the spigot completely.
Preventing Freezing
If you live in an area where temperatures are known to plummet and experiences frost, it is important to understand that water expansion may occur in the spigot and within the water supply pipes. When this happens, a leak may develop. In order to prevent this from happening, perform the steps outlined here:
- First, close off the main water supply valve and completely drain all of the water from the spigot afterwards by opening it up.
- You should then wrap both the spigot and the pipes with insulation designed for the products and features. These are cylindrical pieces, so those with that shape and composed of foam are considered to be ideal.
- Once wrapped securely, you should then duct tape to allow for a complete and highly secure seal.
- Next, install a faucet or spigot that is frost-proof; that is, it can withstand the severe weather conditions.
- Finally, turn back on the water supply and test the spigot to ensure that there are no leaks.
How to Remove the Spigot When the Supply Pipe is Not Accessible
In this case, you may use a pipe wrench that has a long handle. You may also use a specially-designed faucet puller. This will allow you to gain access to the supply line without any complications so that you may secure the pipe while removing the spigot.
Contact Us Today
We here at Reynolds Plumbing are standing by to assist you with all of your plumbing needs – including those pertaining to your outdoor faucets or outdoor spigots. If you want the job done and done well, contact us today! We pride ourselves in our high-quality parts and components and our exceptional customer service. In addition to this, we also specialize in heating and air. We are – truly – your one-stop shop for all things pertaining to home maintenance, repair, and improvement! For more information, contact us today by calling: 765-966-0994